Checks
Checks
2 views
Jun 12, 2026
Updated Sep 01, 2026
Checks
Screen Location - Main Menu > Banking > Checks > Print
Overview
The Checks module (part of Check Writer) allows users to create, print, view, and manage outgoing checks from company bank accounts. It supports bill payments, manual checks, and other disbursements, with direct integration to the General Ledger and vendor invoices.
Checks Screen
This screen is used to enter, edit, and print checks. It is accessed via the Checks tab in the Bank Account maintenance screen.
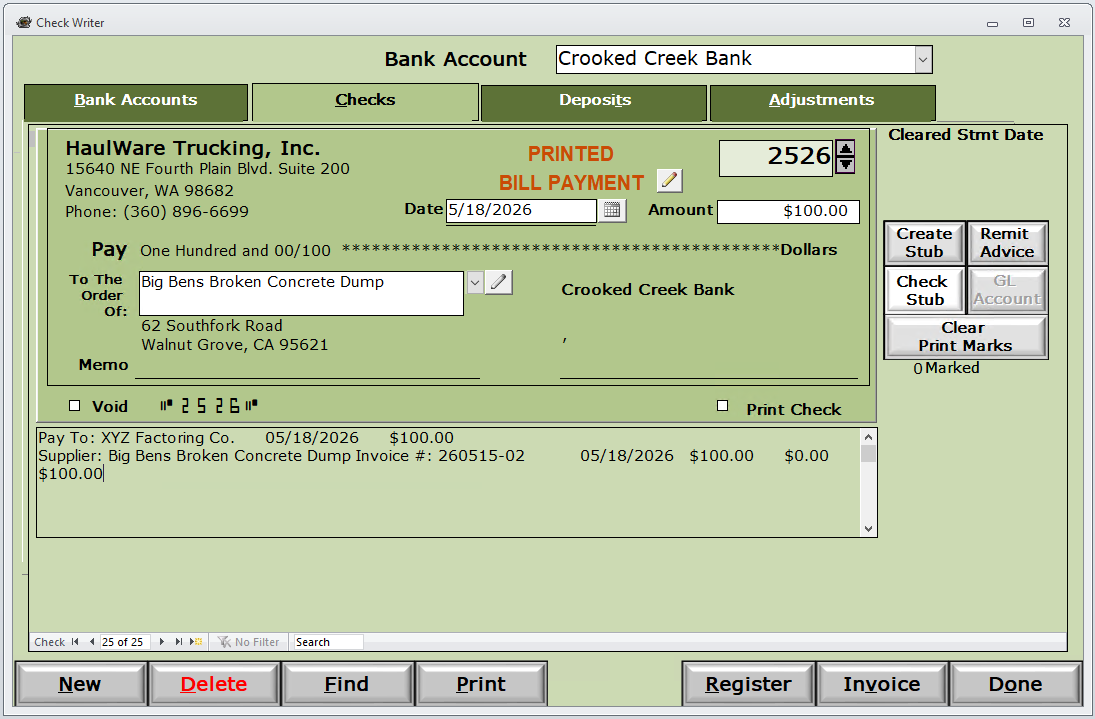
Key Elements:
- Bank Account (Dropdown): Select the bank account from which the check is issued.
- Check Header Information:
- Check Number (e.g., 2526)
- Date
- Amount
- Pay To: Vendor or payee name (linked to supplier records).
- Address: Payee mailing address.
- Memo: Description or reference for the check.
- Invoice / Bill Payment Details: Shows linked invoices being paid (amount, invoice number, etc.).
- Print Check checkbox and status indicators (e.g., PRINTED, BILL PAYMENT).
Action Buttons (Right Panel):
- Create Stub, Remit Advice, Check Stub
- GL Account
- Clear Print Marks
Bottom Action Buttons:
- New: Create a new check.
- Delete: Delete the current check (use with caution).
- Find: Search for existing checks.
- Print: Print the check.
- Register: Open the Check Register for the selected bank account.
- Invoice: Link or view associated invoices.
- Done: Close the screen.
How to Access
- Navigate to Banking > Bank Accounts.
- Select the desired bank account.
- Click on the Checks tab.
- Use New to create a check or double-click an existing check to edit/view it.
Common Uses
- Creating and printing checks for vendor bill payments.
- Recording manual or handwritten checks.
- Viewing check history for a specific bank account.
- Linking checks to specific invoices or purchase orders.
- Generating remittance advice or check stubs.
Tips
- Ensure the correct Bank Account is selected before creating a check.
- Use the Register button to view all check activity and perform reconciliations.
- Checks can be linked to open invoices for accurate accounts payable tracking.
- Printed checks are marked accordingly; use Clear Print Marks if reprinting is needed.
- The system automatically updates the next check number and posts transactions to the General Ledger upon printing/posting.
Please call or Email us for Information on this topic.