Create an Order
Daily Orders
1 views
Mar 18, 2026
Updated Sep 01, 2026
Orders
Screen Location - Main Menu > Operations > Daily Orders
- Double Click on the menu item Daily Orders to open the Order start screen. The Order start screen displays the last 250 records entered.
- Sort the start screen by clicking on the column headings.
- Filter the start screen by entering a value in the field above the column headings.
- Open an existing Order by clicking the Open File Folder to the left of the record.
- Begin a new Order by clicking the New button.
- Exit the Order start screen by clicking the Done button.
Note -- If the job was created from a Job, much of this information will already be populated. However, any field can be overridden.
Entering a new Order:
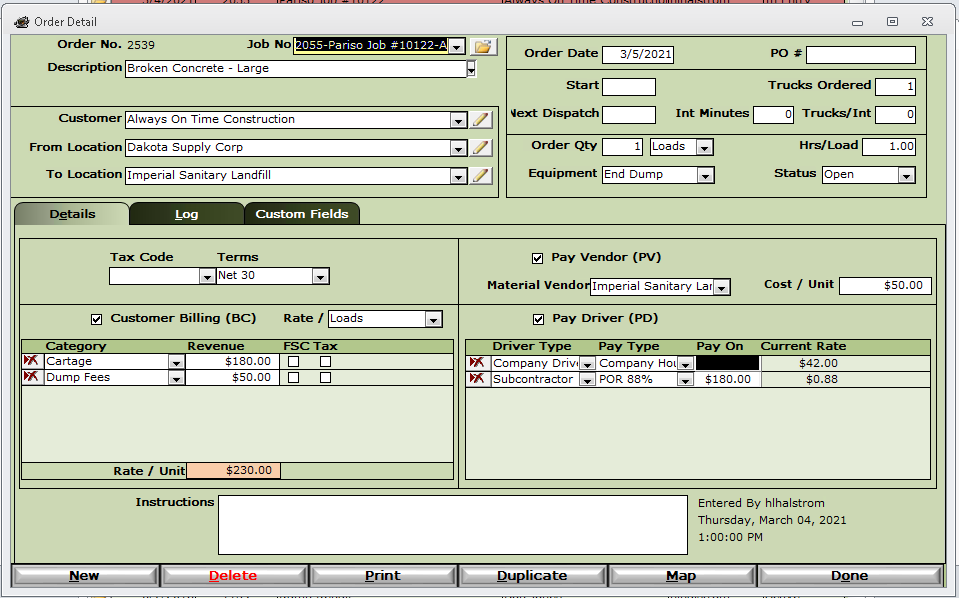
- Job No - This is how to derive an Order from a Job you have previously set up. This is optional as you can create an Order on the fly.
- Description - This is used to select a Job Line after selecting a Job previously. This will pull all relevant information from the Job Line and apply it to your Order.
- Customer - Entering the customer on the order is required. If the Order is for an existing customer you may choose the customer from the drop down or utilize the auto fill by beginning to enter the customer name.
- Note - If the order is not for an existing customer, you can create a new customer by clicking on the Pencil box next to the customer field. The customer information window will pop up and the customer can be created without leaving the Order screen
- From Location - The From Location is the actual address or other location reference of the pickup location. If the location of the pickup already exists in the system you can choose it from the drop down. If the location is new you may add it to the Location File by clicking the pencil box next to the Location field. The Location file window will pop up and the location can be added without leaving the Order screen.
- To Location - The To Location is the actual address or other location reference of the destination. If the location of the destination already exists in the system you can choose it from the drop down. If the location is new you may add it to the Location File by clicking the pencil box next to the Location field. The Location file window will pop up and the location can be added without leaving the Order screen.
- Order Date - The date the order will take place.
- PO # - An optional field to hold the PO number.
- Start - The time the order will start.
- Trucks Ordered - The number of trucks requested for this order.
- Note - This will set the rule in Daily Dispatch of how many trucks can be dispatched to this order
- Next Dispatch - This is a system maintained field that will increment by minutes based on the next field "Int Minutes". This will almost never need to be changed or altered by you, the user.
- Int Minutes - The amount of minutes that will pass before the next dispatch is sent
- Note - This only has effects within Daily Dispatch
- Trucks/Int - The number of trucks to be dispatched per interval previously noted upon
- Order Qty - The amount of material that will be hauled over the course of the order, next to this field is the unit of measure of this amount
- Hrs/Load - Estimated hours that it will take to haul one load on this order
- Equipment - The Equipment Type that will be used on this order
- Status - The status of this order. This will change automatically based on activity on the order. Also, the "Past" "Completed" or "Cancelled" status' will remove this order as an option in Daily Dispatch
Details Tab
- Tax Code - The sales tax code to be used on this order. These are maintained in Sales Tax Rates
- Terms - Defines how payments will be handled. Type of Payment are maintained in Company Setup
- Customer Billing (BC) - This checkbox determines if tickets associated with this order will be eligible in Create Invoices
- Rate / - The unit of measure to be used on this order
- Revenue Items
- Category - This is used to separate your overall revenue into multiple categories. Categories are maintained in Company Setup
- Revenue - The amount of revenue that belongs to the previous category
- FSC - Determines if this revenue to applicable to Fuel Surcharge
- Tax - Determines if this revenue taxable
- Rate / Unit - Total revenue to be made per unit of measure
- Pay Vendor (PV) - This checkbox determines if tickets associated with this order will be used to pay the material vendor
- Material Vendor - The vendor of the material being hauled on this order
- Cost / Unit - The cost per unit of measure
- Pay Driver (PD) - This checkbox determines if the tickets associated with this order will be used to pay the driver
- Payable Items
- Driver Type - The Driver Type eligible for this work. Driver types are maintained in Company Setup
- Pay Type - This sets the drivers pay rate calculation. Pay Types are maintained in Pay Types
- Pay On - Depending on how the Pay Type is set up, this may or may not need to be filled in. Gives the Pay Type an amount to calculate on
- Current Rate - The total amount per unit that the driver will be paid based on Pay Type
- Instructions - This is a free form message that will be delivered with every dispatch to the driver on this Order