Receive Payments
Receive Payments
Use this option to apply payments to open invoices. Payment may be from a paper check, a credit card transaction, or ACH (EFT) directly to your bank. In all of these instances, you may use this screen to apply the payment to one or more invoices. Payments are not customer-specific, for example, a single check may pay invoices from multiple customers. You are not limited to apply a check to just one customer.
Screen Location - Main Menu > Accounts Receivable > Receive Payments
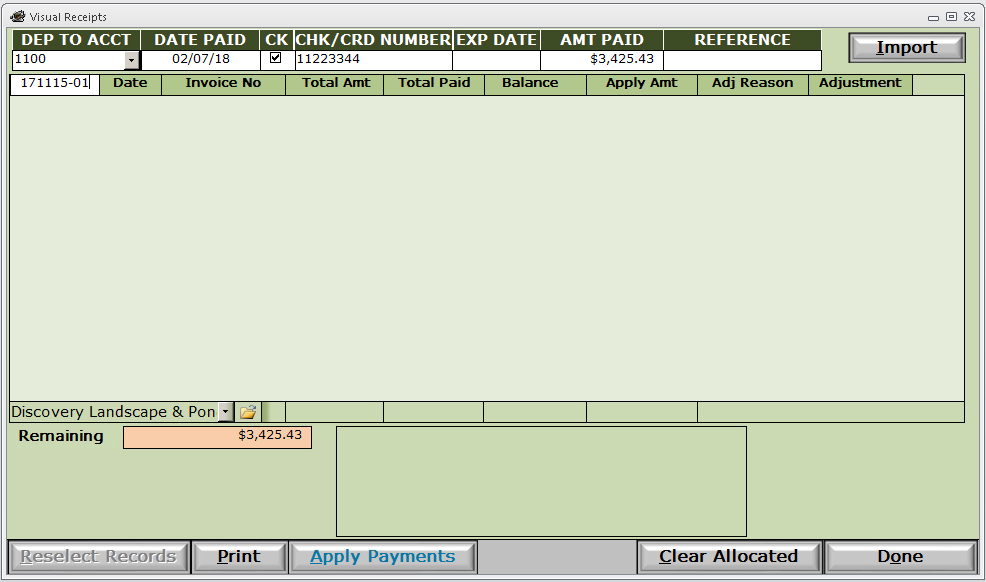
DEP TO ACCT - Deposit To Account - HaulWare uses a clearing account, Undeposited Funds, (normally a zero-balance) to temporarily hold the amount of cash that has been applied to invoices. We will need this account when we create a Banking > Deposit Slip to move the cash from Undeposited Funds to your Cash account. Do not change this option unless instructed by HaulWare support.
DATE PAID - This will be the date you want to be reflected as the payment date for the invoices this check is paying. NOTE: HaulWare will use this date to calculate the payment days for this invoice, then average payment days for this customer, then average payment days for all customers.
CK - This checkbox indicates that this payment will be appearing on a Banking > Deposit Slip. Do not change this option unless instructed by HaulWare Support.
CHK/CRD NUMBER - Check or Credit Card Number - Enter check# if this is a paper check. Enter reference number if this is an ACH (EFT) payment. Enter the credit card number if this is a credit card payment.
EXP DATE - Credit Card Expire Date - If this is a credit card payment, enter the card expiration date, otherwise leave blank.
AMT PAID - Amount Paid - This is the payment total that must be applied in full to existing open invoices.
REFERENCE - If this is a credit card payment, enter the reference#, otherwise leave blank.
Import button - If you have a spreadsheet or import file from a customer that details your customers payment information, contact HaulWare Support to setup.
You now have 2 methods of entering invoices to apply this check to the invoices.
1) Manual invoice number entry - Under the DEP TO ACCT field is an entry field. Enter an invoice number directly into that field to select it to be applied by this payment. Enter all invoice numbers in this field until the full amount of the check has been applied.
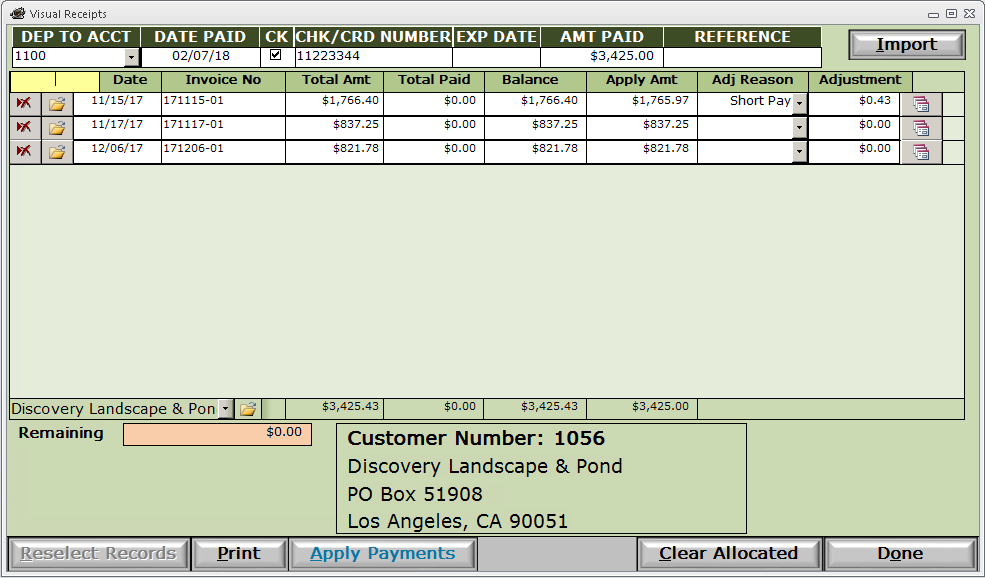
- If the invoice is short paid, override the Amt to Alloc to the smaller amount.
- If you wish to write off the remaining balance, click the drop-down list form the Adj Reason column to select the reason for the short pay.
- Enter the write off balance in the Adjustment column. (Typically the Amt to Alloc plus the Adjustment amount will equal the full amount of the invoice.)
- Optional: If invoice is short paid, click the
 button to identify which tickets on this invoice has been paid. See the Ticket Receipts FAQ for more information.
2) Select from customer list - Further down the left side, see the drop-down box with a customer name (Discovery Landscape). Select the customer for this check and then click the open folder icon to the right to display a window of all open invoices.
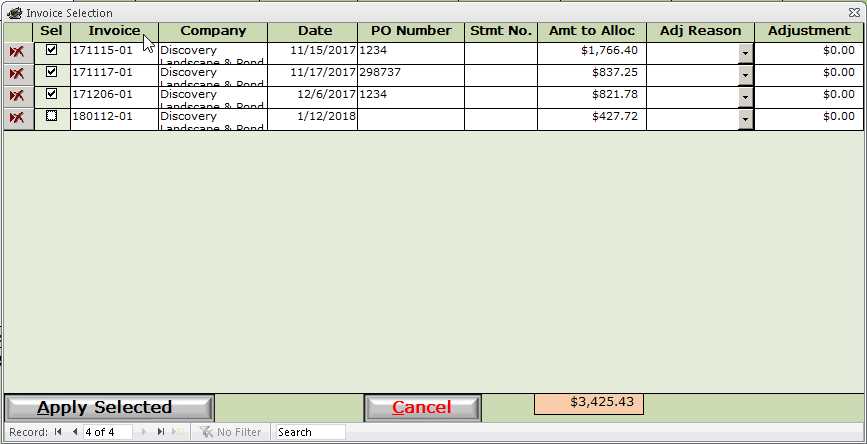
- Click the checkboxes down the Sel column to select that invoice for payment. The full amount of the invoice (up to the remaining amount of the check) will be applied by default in the Amt to Alloc column.
- If the invoice is short paid, override the Amt to Alloc to the smaller amount.
- If you wish to write off the remaining balance, click the drop-down list form the Adj Reason column to select the reason for the short pay.
- Enter the write off balance in the Adjustment column. (Typically the Amt to Alloc plus the Adjustment amount will equal the full amount of the invoice.)
Click Apply Selected button to accept the selected invoices and amounts.
Once the Remaining balance to be applied (lower left) is zero, click the Apply Payments button to apply your payments.
Print button - Click to print a report showing each invoice it was applied to for this check.
Clear Allocated button - Click to print if you want to clear your invoices and start applying the check again.
Done button - Click to exit. NOTE: This will not apply any payments. If you wish to apply the payment to the invoices before exiting, click the Apply Payments button first.
The next step after applying your payments is to prepare your deposit slip for your bank as usual.
We want to also create a Banking > Deposit Slip entry in HaulWare that matches your physical deposit slip to your bank. See Deposits for more information.