Driver Detail
After clicking New or selecting an existing driver from the Driver Start Screen, you will fill out the Detail screen.
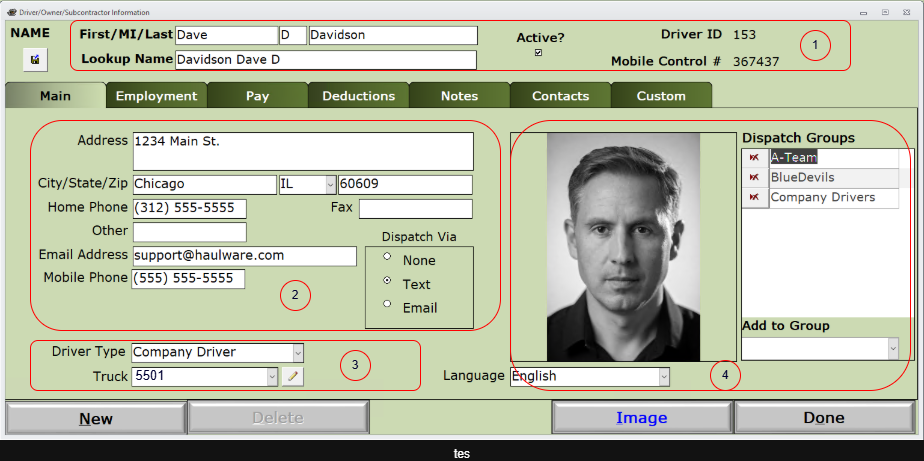
In the far upper left is a button under the NAME label. This button will take the general information from this driver record and download a .vcf format file to your local computer Downloads folder. See the article on Drive Mapping for more information about the location of this folder. This format will import into most Contact lists such as Outlook and Google.
- In the case of a driver, you will have a First/MI/Last name to enter. If this is a sub-hauler, this field is optional.
- Lookup Name - Here you have a choice of how you want to see the driver displayed in dropdown lists. You may enter last name first, first name first, or the sub-hauler company name.
- Active is checked by default and may be unchecked to prevent this driver from appearing in any dropdown lists.
- Driver ID - System assigned.
- Mobile Control # - System assigned unique number. Used as a password in some HaulWare apps.
- Enter address information, phone, and email.
- Dispatch Via is the delivery method by which the driver will receive their dispatches.
- If an Email Address is provided, the Email option will be available.
- If a Mobile Phone number is provided, the Text option will be available.
- None will exclude the driver from receiving any dispatches.
- Driver Type - HaulWare provides 2 standard driver types, Company Driver and Subcontractor. More driver types may be added in the Company Setup.
- Truck - This option is only available when the driver type is Company Driver. It will dropdown the tractors in your Equipment file and be the default truck number when your company driver is dispatched.
- Language - HaulWare provides 9 different languages to translate dispatches.
- Add a photo of the driver by saving the .jpg or .png image to your local computer and clicking the Image button. Follow the image viewer instructions to Acquire the image from your local computer, and then attach it with the document type of Driver Photo (DP).
- Dispatch Groups - These groups allow a dispatcher to create groups of drivers that may be typically dispatched together for reasons such as equipment types, certifications, geographic locations, etc.. Add or remove this driver from any of the existing groups using the delete buttons on each group line, and the Add to Group dropdown list. See driver dispatch for information on creating and deleting groups.
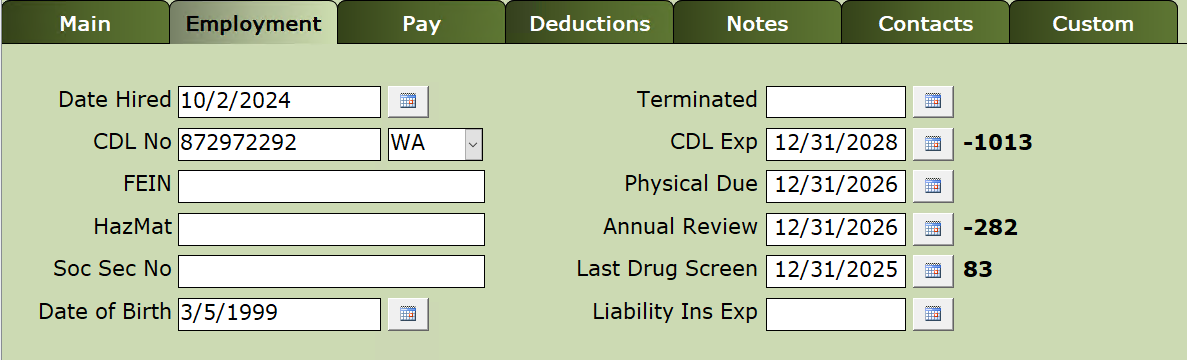
The Employment tab is only available when the driver type is Company Driver. It records dates, federal ID, CDL and other information. The CDL Expire, Physical Due, Annual Review, and Liability Ins Expiration will be used in the Driver Expiration Report in the Reports section.
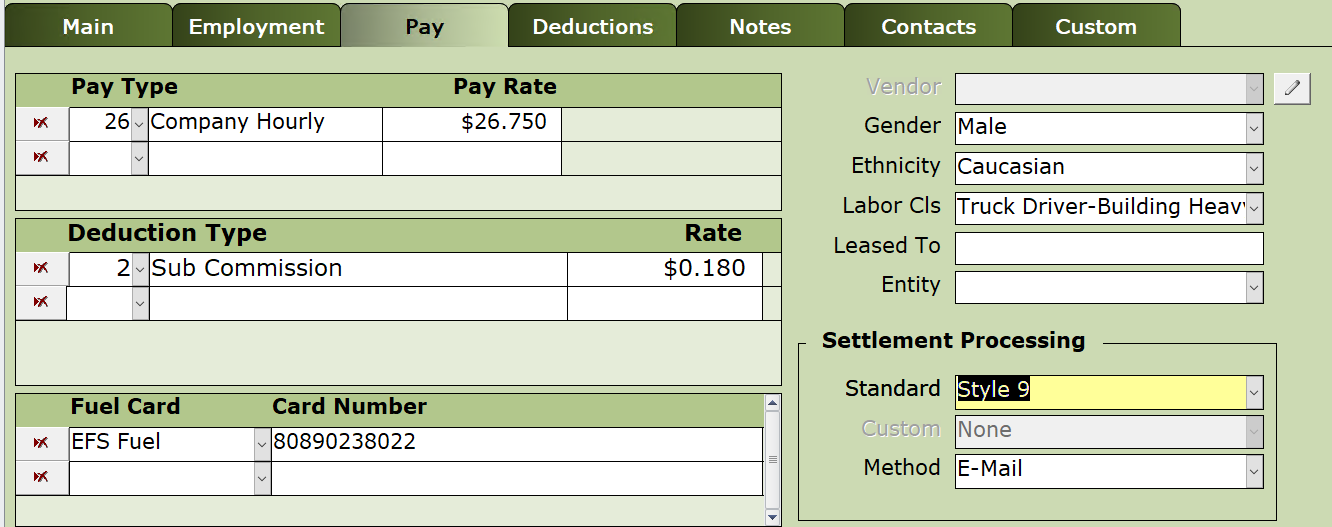
Pay Type - This drops down the different pay types in the Setup > Pay Types option, allowing each driver to have their own rate for each pay type.
Deduction Type - This drops down the different Deduction Types from the Setup > Deduction Types option, allowing each driver to have their own rate for each deduction type.
Fuel Card - This lists all of the Fuel Cards held that stay with this driver. Note: The Equipment File also has a Fuel Card list for cards that stay with the truck.
On the right side are settings that pertain to payroll or subcontractor pay.
Vendor is disabled hen the driver is a Company Driver, the first field. When a subcontractor, this connects this driver to the vendor that will be paid in the Accounts Payable system. The pencil button to the right will do 2 things depending on the value in the Vendor field:
- When the vendor field is blank, it will ask to set up a Vendor record using the information from this Driver record.
- When the vendor field has a value, it will open the Vendor record for that vendor related to this driver.
Entity is the type organization structure for a subcontractor. (LLC, Corp., etc.)
Settlement Processing - defines the layout style of the settlement as well as the delivery method. Email or Paper. Custom is only available when you have contracted with Artronix to develop a custom layout style in a billable project.
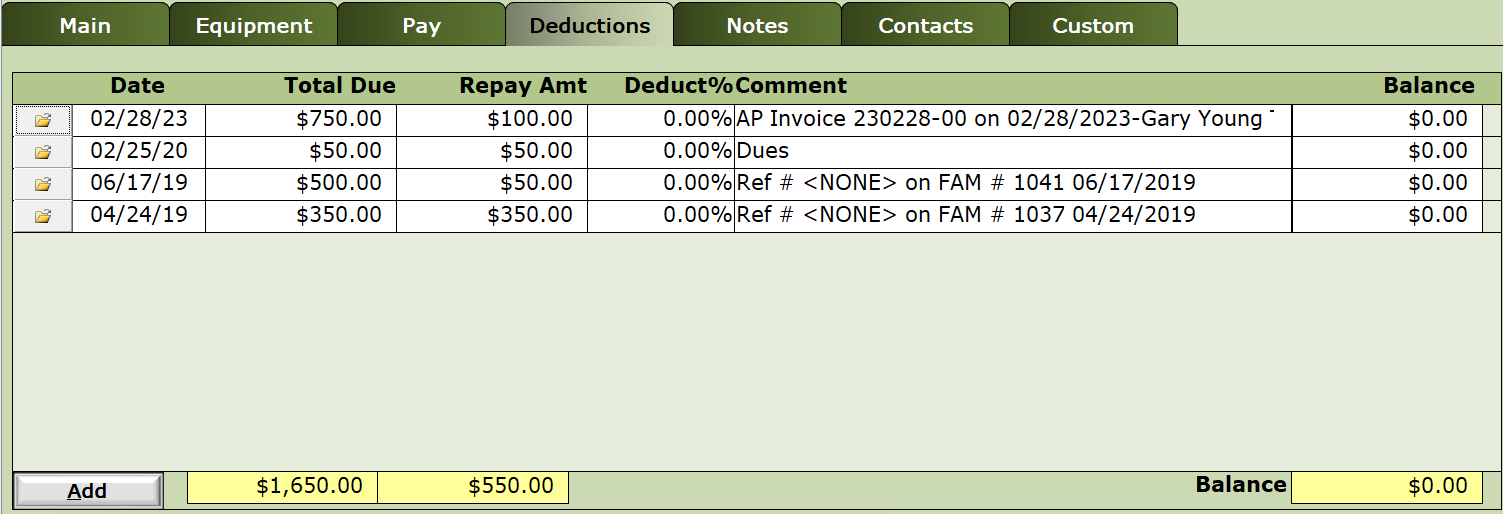
Deductions on this tab are primarily for subcontractors and will show any deductions necessary to recover expenses. For example, if the sub is using your fuel card, owes you for a repair, loans, etc.. These deductions can be set up from several places in the system including when paying an AP Bill, from the FAM (Fuel Account Management) system, manual journal entries, and banking adjustments.
Repay Amt - allows smaller amounts than the Total Due to be repaid, until the Balance is zero.
Add button - A deduction may be manually created but please use Setup > Deduction Types file for any new deductions.

Notes for anything to remember about this driver/subcontractor. Click the Open Folder icon on the last line to open the dialog and enter the note.

Contacts to list all individuals at a subcontractor.
ES - flag to determine who will receive the emailed settlements. If an Email is present, the contact may receive the emailed settlements.
Use the Open Folder icon to open the dialog and create a new contact, edit an existing contact, or delete an existing contact.
Custom tab - See Custom tab for more information.